Last year I screwed up BIG TIME on some client jobs. The shame I felt making mistakes is indescribable, and led to a crisis of confidence. But each time I picked myself up out of the ditch, made sure the client wasn’t out of pocket as a result, and worked furiously to learn where I went wrong and to improve my knowledge or skills for next time.
It’s a brutal way to learn, especially when you’re running a business and meant to be the person in-the-know. But as I tell my community of D-I-Y women:
- Nobody is perfect (all the time)
- Even skilled and experienced trades make mistakes (actually quite frequently)
- Most things are fixable

But it still sucks!
I'm first to admit, I didn’t grow up handy. I came late to this whole D-I-Y / handywoman thing, and I am on an ongoing (never-ending) learning journey which I reckon is actually a great way to approach things. Turns out, I am in fact not a natural with my hands (I am better in the brains department!) and sometimes it takes me a while to really nail a
new skill. Plus, when I don’t do the same trade all day every day, it’s no wonder I end up the proverbial "jack of
all trades, master of none", right?
The mistakes I made in 2024 did lead to lessons and improvement, so below is a bit of a wrap-up so you can learn the easy way instead. 😊
Biggest Muck ups and What I Can Share as a Result
Door Handles
On 3 separate jobs I faced door handle challenges:
- At Erica’s, the problem was just that my pace was slow on account of having to chisel out new recesses for the latch
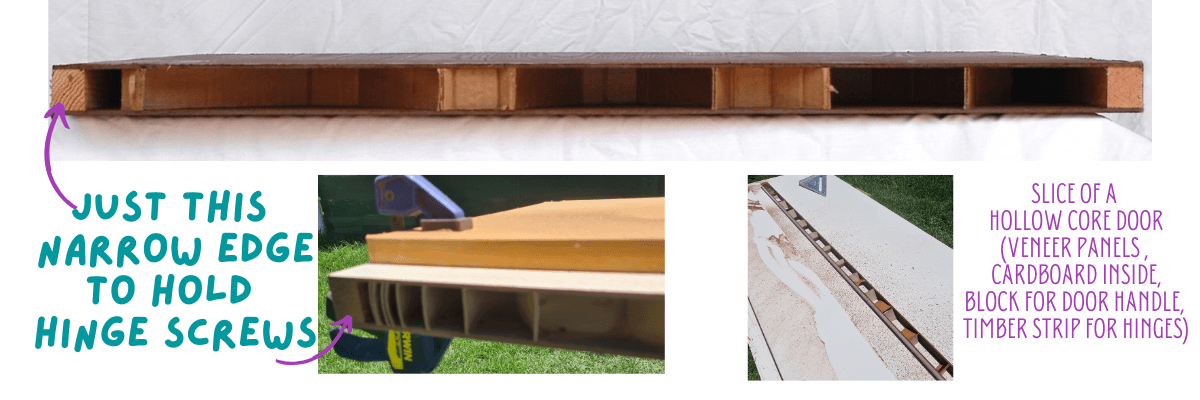
plate (I haven't done many of these since carpentry school). The great news, even as a novice, Erica was a gun at this task! Secondly, enlarging a hole (for the handle) through a hollow core door is challenging because the hole saw functionality is forfeited when there’s nothing for the pilot bit to drill through. A guide/jig or a piece of plywood is the answer. (see here) - Without instructions, drilling the right holes at the right measurements was less than accurate on Olivia's job. Plus, in another case of drilling where an existing hole had been (poorly) repaired, it meant the result was a bit rough (note to all: polyfilla does not behave like timber!). The lesson here is to know your setback, drill perfectly straight, and understand the configuration of the assembly and required cut out sizes. Manufacturer instructions are key.
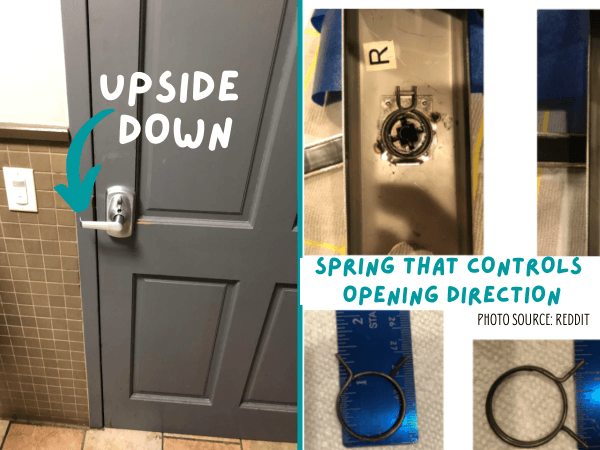
3. Not all handles are made equal. Cheap brands have restricted functions – like the handle not suited to both left and right opening. The ones Amanda bought had one right way up, which means when installing it to fit a specific door set up, it may result in a handle you must lift up the handle to open! (Which is not compliant by the way due to fire safety regulations). Sometimes they have a little spring coil you can reverse so it opens the correct way (see below).
Door Hinges
- Bron had a toilet door that was sagging. I tried a few hinge fixes I knew, to no avail. When I took the hinges off the door, I discovered someone before me had shaved the side of the hollow core door down so much that only a sliver of timber veneer was holding the entire door weight at the hinges (which had inevitably failed). The mistake I made was not having a back-up plan when my attempts to fix the problem actually made it worse! The fix required adding a bracing piece of timber down the side, but I couldn’t do this on the day which left them without a toilet door! The lesson to share is YOU CANNOT CUT DOWN A HOLLOW CORE DOOR because they’re hollow inside!! You have 50mm tops of wiggle room (refer to manufacturer info).
2. Do y’all know you shouldn’t paint over hinge screws? Removing screws whose heads have been painted (especially old flat head ones) is sooooo hard! So is removing rusty or bent hinge pins. And finally, screwing back into the original hinge holes may cause the new hinge to bind on the door if it doesn't fit properly. These were my challenges on Ali’s job. Luckily they got their front door re-attached due to sheer persistence (and an extra trip to Bunnings!).
Floating Shelves
The absolute bane of my life. Some floating shelves are designed better than others, but when Rachel’s custom shelves required holes drilled out for steel rods, there was not a millimetre of error allowed! Despite using a drill guide, measuring and re-measuring (and measuring another 5 times!!), positioning my body to drill as straight as possible, and drilling in increasingly larger sizes (ie: starting at 5mm, then 6mm then 8mm and so on), one of my 12mm pilot holes in the timber was not 90°. With the rod on a slightest angle, it wouldn’t go into my perfectly aligned holes in the studs. NIGHTMARE!!
Sadly, there was no real lesson to be learnt here because there’s nothing I could have done differently. However, knowing how to fix a f*** up is as important as knowing how todo the original job. I leaned on mentors for advice, and they really came through!

Garden Bench
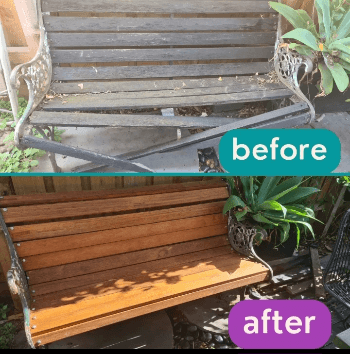
Replacing the slats on an old, rotten garden seat should be simple, but a combination of factors at Emma's meant it wasn't done to standard. Firstly, I had inadequate info from the client about the job. Secondly, I couldn’t source the same sized timber slats. The holes in the steel sides of the seat are pre-drilled, so the spacing of the slats is fixed (any difference to originals means they won't fit properly). Thirdly, drilling straight when the drill motor is butting against something means you don't get a straight pilot hole, and skew-whiff bolts look shabby. Really I needed a longer drill bit. Finally, I didn’t think through the job properly in advance. I failed to hold the two sides equidistant apart along the length - a big mistake. It resulted in a creep in the length of each slat which by the time I reached the top caused a noticeable lean. Argh! Standing it on end would have prevented this issue (and made it easier to slide in each slat).
Consequently, this job took me so much longer than I expected, and I had to go back to fix it (free of charge) because I couldn’t stand it not being right. Looked better than before in any case!
What I learned when things went wrong
At the risk of reducing things down to slogans, the lessons are actually simple:
- I can’t know everything. It’s impossible to account for every scenario I’ll face onsite.
- Sometimes you only learn by doing and making the mistake.
- Knowledge doesn’t equal skill. (This is a biggie)
- When working on older homes, it’s common to experience what I call a ‘reno surprise’. Basically, previous jobs that we discover haven’t been done properly, or maybe it was at the time but it’s not how it’s done anymore because it’s a terrible way to do something. We just have to deal with what we've got, and find workarounds.
How I course corrected
There’s no advantage to me wallowing in my shame and misery, so I used each mistake as a learning opportunity (and a teaching moment by sharing it). To get better I focused on....
- Research and getting the info I need to get from clients - understanding the job before I begin is a really
important, unmissable step. That includes a back-up plan! There is no shame in taking the time to fully read the manufacturer instructions either. - Practice – I can only get good through repeated practice so I try to spend time outside my job getting hands-on
with new skills. - Acquiring the right tool/s for the job – those tools that make it easier to do a task, or limit the margin for error (eg: drill guide for straight drilling, extra long drill bits etc)
- Setting expectations and being transparent – telling my clients when I am not 100% confident. Sometimes the best I can do is leverage prior experience and apply it to a new situation. We’re doing D-I-Y here! I'm not qualified in every job I am asked to do.
- Don’t bite off more than I can chew – say no to jobs where the stakes are high, or ask for help if I need it.
I really believe that bringing more integrity to trades is desperately needed. Doing so is part of the She Bangs ToolSchool mission. To me, that means admitting one’s mistakes, learning from them, and being completely transparent about the service being provided.
I hope this blog has gone some way towards that aim. Now if we can convince every tradie to be as honest as me!